-1.png?width=1920&height=970&name=Juno%20Tax%20Prep%20Advisory%20Review%20(1)-1.png)
In this article we’ll walk you through how to get started with Reviewer. You’ll learn best practices and how to integrate Reviewer into your firm’s processes.
What is Reviewer?
Reviewer offers a wide range of functionality for firms to streamline their review process. Within the Reviewer tab you’ll find two products:
- Reviewer - keep reading for more details on using Reviewer
- Binder - The Juno Binder product allows you and your team to mark up the binder Juno generates of all your client’s documents. For more details on how to use the Binder check out our Getting Started with Binder article
How and When To Use Reviewer?
After exporting your data from Juno to your tax software and preparing the return, generate a draft return in PDF format. Then return to Juno, open the Reviewer tab and upload that draft.
Step 1: Reviewer Dashboard
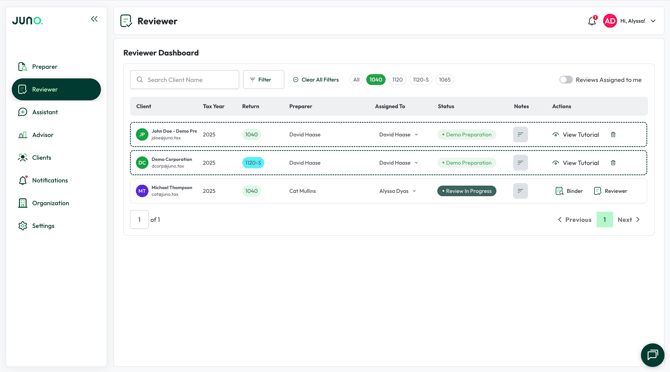
The Reviewer Dashboard reflects all your in progress preparations. After completing Preparer and exporting the data to your tax software you can search in the Reviewer Dashboard for the client.
You can also assign a review to a member of your team using the “Assigned To” column. Additionally, the filters allow you to refine your search across several variables.
Once you are ready to get started, click “Reviewer” on your desired preparation.
Step 2: Adding Documents for Review
The first step of Reviewer is uploading documents for Juno to conduct its analysis. Reviewer will analyze three different documents, two of which are optional.
- Current Year Draft Return (required) - After completing Preparer generate a draft return of your client’s return and upload it on the below page.
- Prior Year Return (optional but recommended) - Juno will conduct an analysis using the prior year return if you choose to upload it.
- Organizer (optional but recommended) - Upload your client organizer/questionnaire in PDF or CSV format. This will allow Juno to analyze your clients responses and compare them to what is present on the draft return.
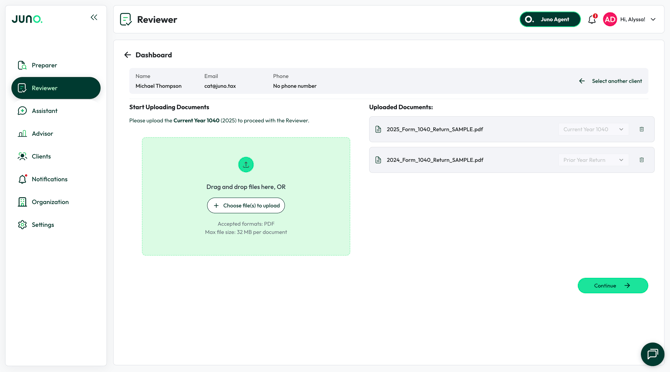
After uploading your documents ensure that each document is classified correctly via the dropdown menu. Once they are click “Continue”
Important Note: If you uploaded your client’s organizer in Preparer you’ll see that organizer display in the “Uploaded Documents” section. No need to upload it twice.
Step 3: Document Processing
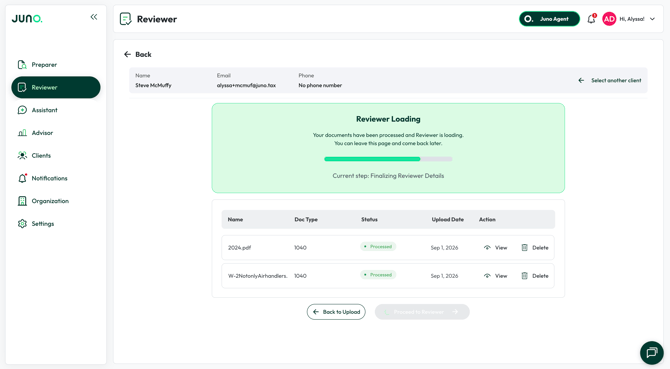
After hitting “Continue” you’ll see Reviewer update to show your documents processing. Reviewer is analyzing a lot of data which takes a few minutes to complete. You can leave Reviewer or do other work while the documents are processing.
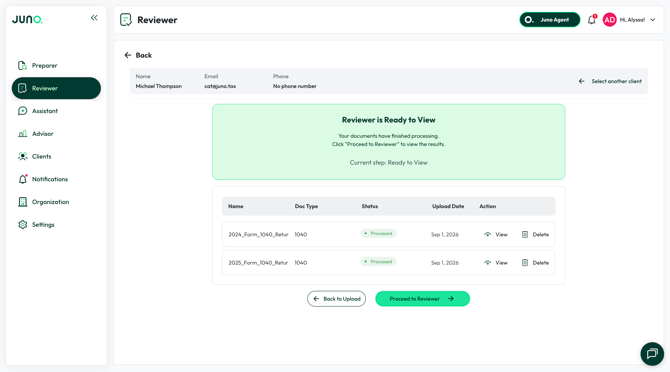
Once all documents are “Processed” you select “Proceed to Reviewer” to see the results.
Step 4: Understanding Reviewer’s Analysis
Upon entering Reviewer you'll see that there are 3 tabs available to you. The goal of these tabs is not to automate review, but rather streamline your review process.
If you uploaded all three documents you'll see analysis in each tab. Below is a quick explanation of each tab and how to use it as part of your review process.
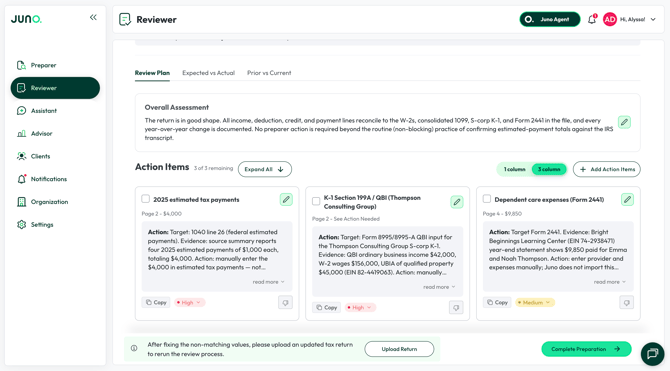
- Review Plan - The Review Plan tab gives you an Overall Assessment of the return plus a list of Action Items, so you know where to focus before you open the file.
- Overall Assessment. A short summary of what Reviewer verified across the return. Edit it directly if you want to adjust the wording before sharing it with a colleague or client.
- Action items, not just flags. Each item shows the page and dollar amount involved (or "See Action Needed" when there's no dollar figure), what to check, and why. Set a priority (High, Medium, Low), expand for the full explanation with "read more," copy the item's text with one click, and check items off as you resolve them. Use Expand All to open every item at once, or 1 column / 3 column to switch the layout. The counter at the top tracks how many are left, and + Add Action Items lets you log anything of your own that Reviewer didn't catch. Preparation Checklist.
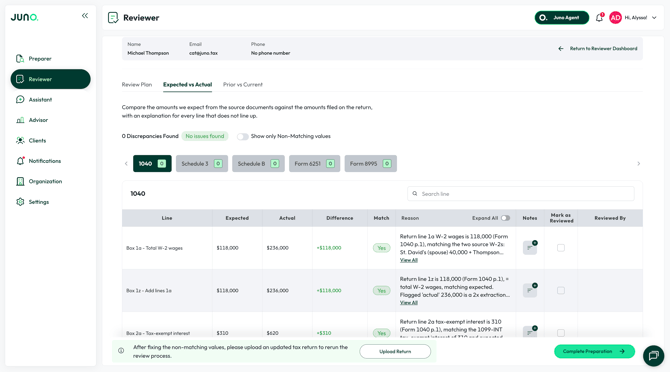
- Expected vs Actual - Compares the amounts expected from your source documents against what's actually filed on the return, with an explanation for every line that doesn't line up. The tab shows a running discrepancy count at the top, and a Show only Non-Matching values toggle to jump straight to what needs your attention. Each row includes a plain-language reason for any difference, expandable with View All. Use Notes and Mark as Reviewed to track your progress line by line, and Reviewed By to see who's already checked it.
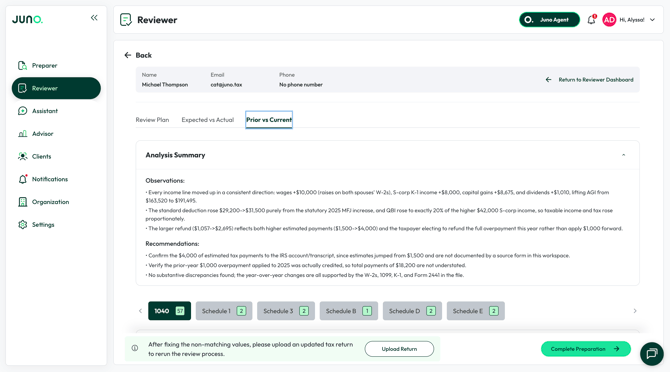
- Prior vs Current - Compares this year's return to last year's, form by form. An Analysis Summary at the top calls out what changed and why, plus recommendations for anything worth confirming before you sign off. Below that, a line-by-line table shows every changed item across each form and schedule, so you can see exactly what shifted year over year without re-checking every line yourself.
How to Use Reviewer With Your Team
Whether you are upskilling preparers to do the first pass of review, or have a multi-step review process, Reviewer allows you to collaborate with your team.
The following columns in Reviewer allow you and your team to work together:
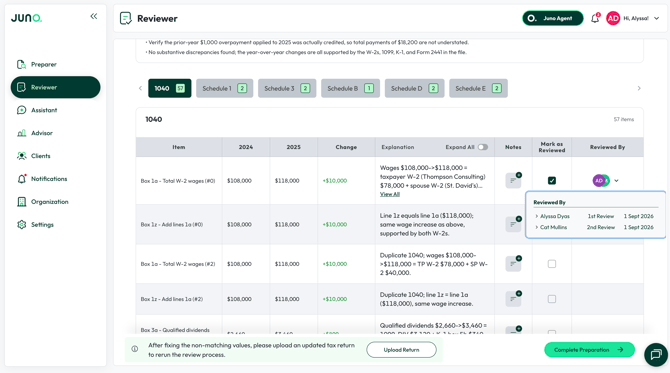
- Notes - The Notes field allows you and your team to communicate and share updates on a field. A common use case here is communicating to the rest of the team or as a note to yourself that the field has been updated in the tax software.
- Mark as Reviewed - Use the Mark as Reviewed field as either your own personal checklist or a way to communicate with your team which fields pass Review.
- Reviewed By - After you click “Mark as Reviewed” you’ll notice your profile icon will display in the “Reviewed By” channel. This communicates to your team who has completed a review and when they did so.
Common Reviewer Questions
Q: If I make changes in Reviewer does it update the return in my tax software?
A: No, Reviewer purely streamlines your reviewer process and identifies items that you might need to review. In order to apply any changes that Reviewer identifies you will need to make the changes in your tax software.
Q: Once I make the changes in my tax software that Reviewer identifies, can I run Reviewer again to see the updates?
A: Yes! Once you have made updates in your tax software, generate a new draft return and in Reviewer click “Upload Return” and upload the updated draft return. Reviewer will process the new return and update the analysis to reflect your changes.