-1.png?width=1920&height=970&name=Juno%20Tax%20Prep%20Advisory%20Review%20(1)-1.png)
In this article we’ll walk you through how to get started with Preparer. You’ll learn best practices and how to integrate Preparer into your firm’s processes.
Step 1: Check out the Preparer Tutorial
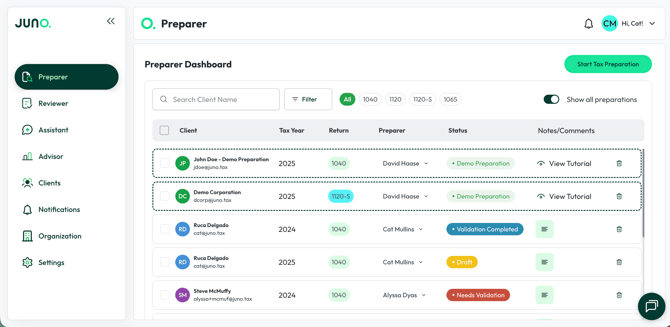
If you haven’t already, try out the Preparer tutorial by clicking on the “John Doe - Demo Preparation” preparation in the Preparer dashboard. This tutorial will walk you through the basics of Preparer. There are a few example documents included in the preparation.
You can always delete this example preparation from your Preparer dashboard by clicking the trash can icon on the right side of the screen.
Step 2: Start a Tax Preparation
Now that you understand the basics of Preparer, it is time to try it out on one of your own clients returns! When first getting started with Preparer, we recommend choosing returns that are indicative of the majority of your firm’s workload.
Many firms jump right to trying one of their most complex returns as part of evaluating Juno. We recommend trying a variety of returns when first starting out. Being a CPA is challenging, and you’ll find Juno handles the vast majority of tax prep, but its important to understand where you and your team will need to be part of the process.
Once you have a few returns in mind, navigate to juno.tax in your web browser and sign in. Once logged in, select the “Start Tax Preparation” button in the upper right of your screen.
Now select the return type you would like to begin, select "Continue", then either select the client from the drop down if they exist in Juno already, or "Add New Client" if this is their first preperation. Lastly select which year you will be preparing. It is important to note that after becoming a Juno customer, our Customer Success team will walk you through connecting your tax software and syncing your clients so they are available in the select client dropdown.
Step 3: Upload Source Documents and/or Prior Year Return
Now you’re ready to start uploading source documents. Upload this year's source documents for the client by dragging and dropping them into the upload container or via an integration with file storage platforms. We currently support integrations with SmartVault, Sharepoint/OneDrive, and Box. You can also include the client's prior year return in the same upload.
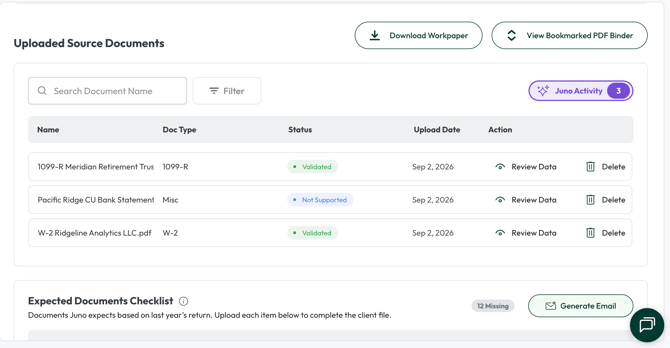
You’ll notice some documents receive a status of “Not Supported” this indicates that Juno can not extract any data from the document. However unsupported documents will be still be included in the Binder that Juno creates for you and can still be used for Advisor.
When a prior year 1040 is uploaded, Juno reads it and populates the "Expected Documents Checklist" on the uploaded source documents screen. This checklist lists the specific documents your client is expected to provide for the current year, based on what was reported on the prior year return - shown as document type plus issuer (for example, "2025 W-2 Disney"), for easy reference. Each document lists its type, status, and an action to upload or remove it, as needed.
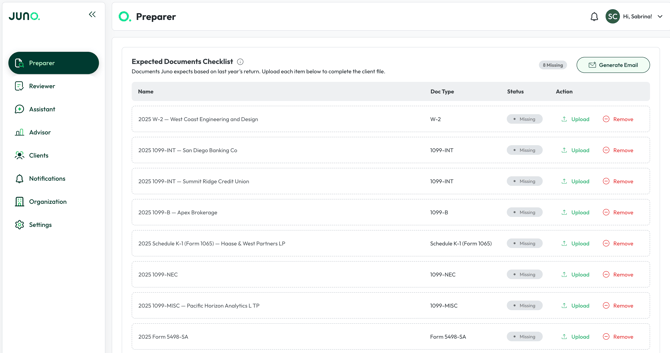
Once the checklist is in place, select "Generate Email" on the same screen to have Juno draft a client email listing the documents that are still missing. The draft is fully editable, so you can review and adjust it before copying it over to send.
As you will see, Juno extracts the data in real-time allowing you and your team to Validate the data in an easy to use interface. We call this the Human-in-the-loop screen. Whether you are upskilling your admin team, or supercharging your preparers, the Human-in-the-loop screen does more than validate data.
As seen below, Juno not only extracts data but also notifies you of documents that don’t match the current year, along with several other checks that are helpful in the heat of tax season.
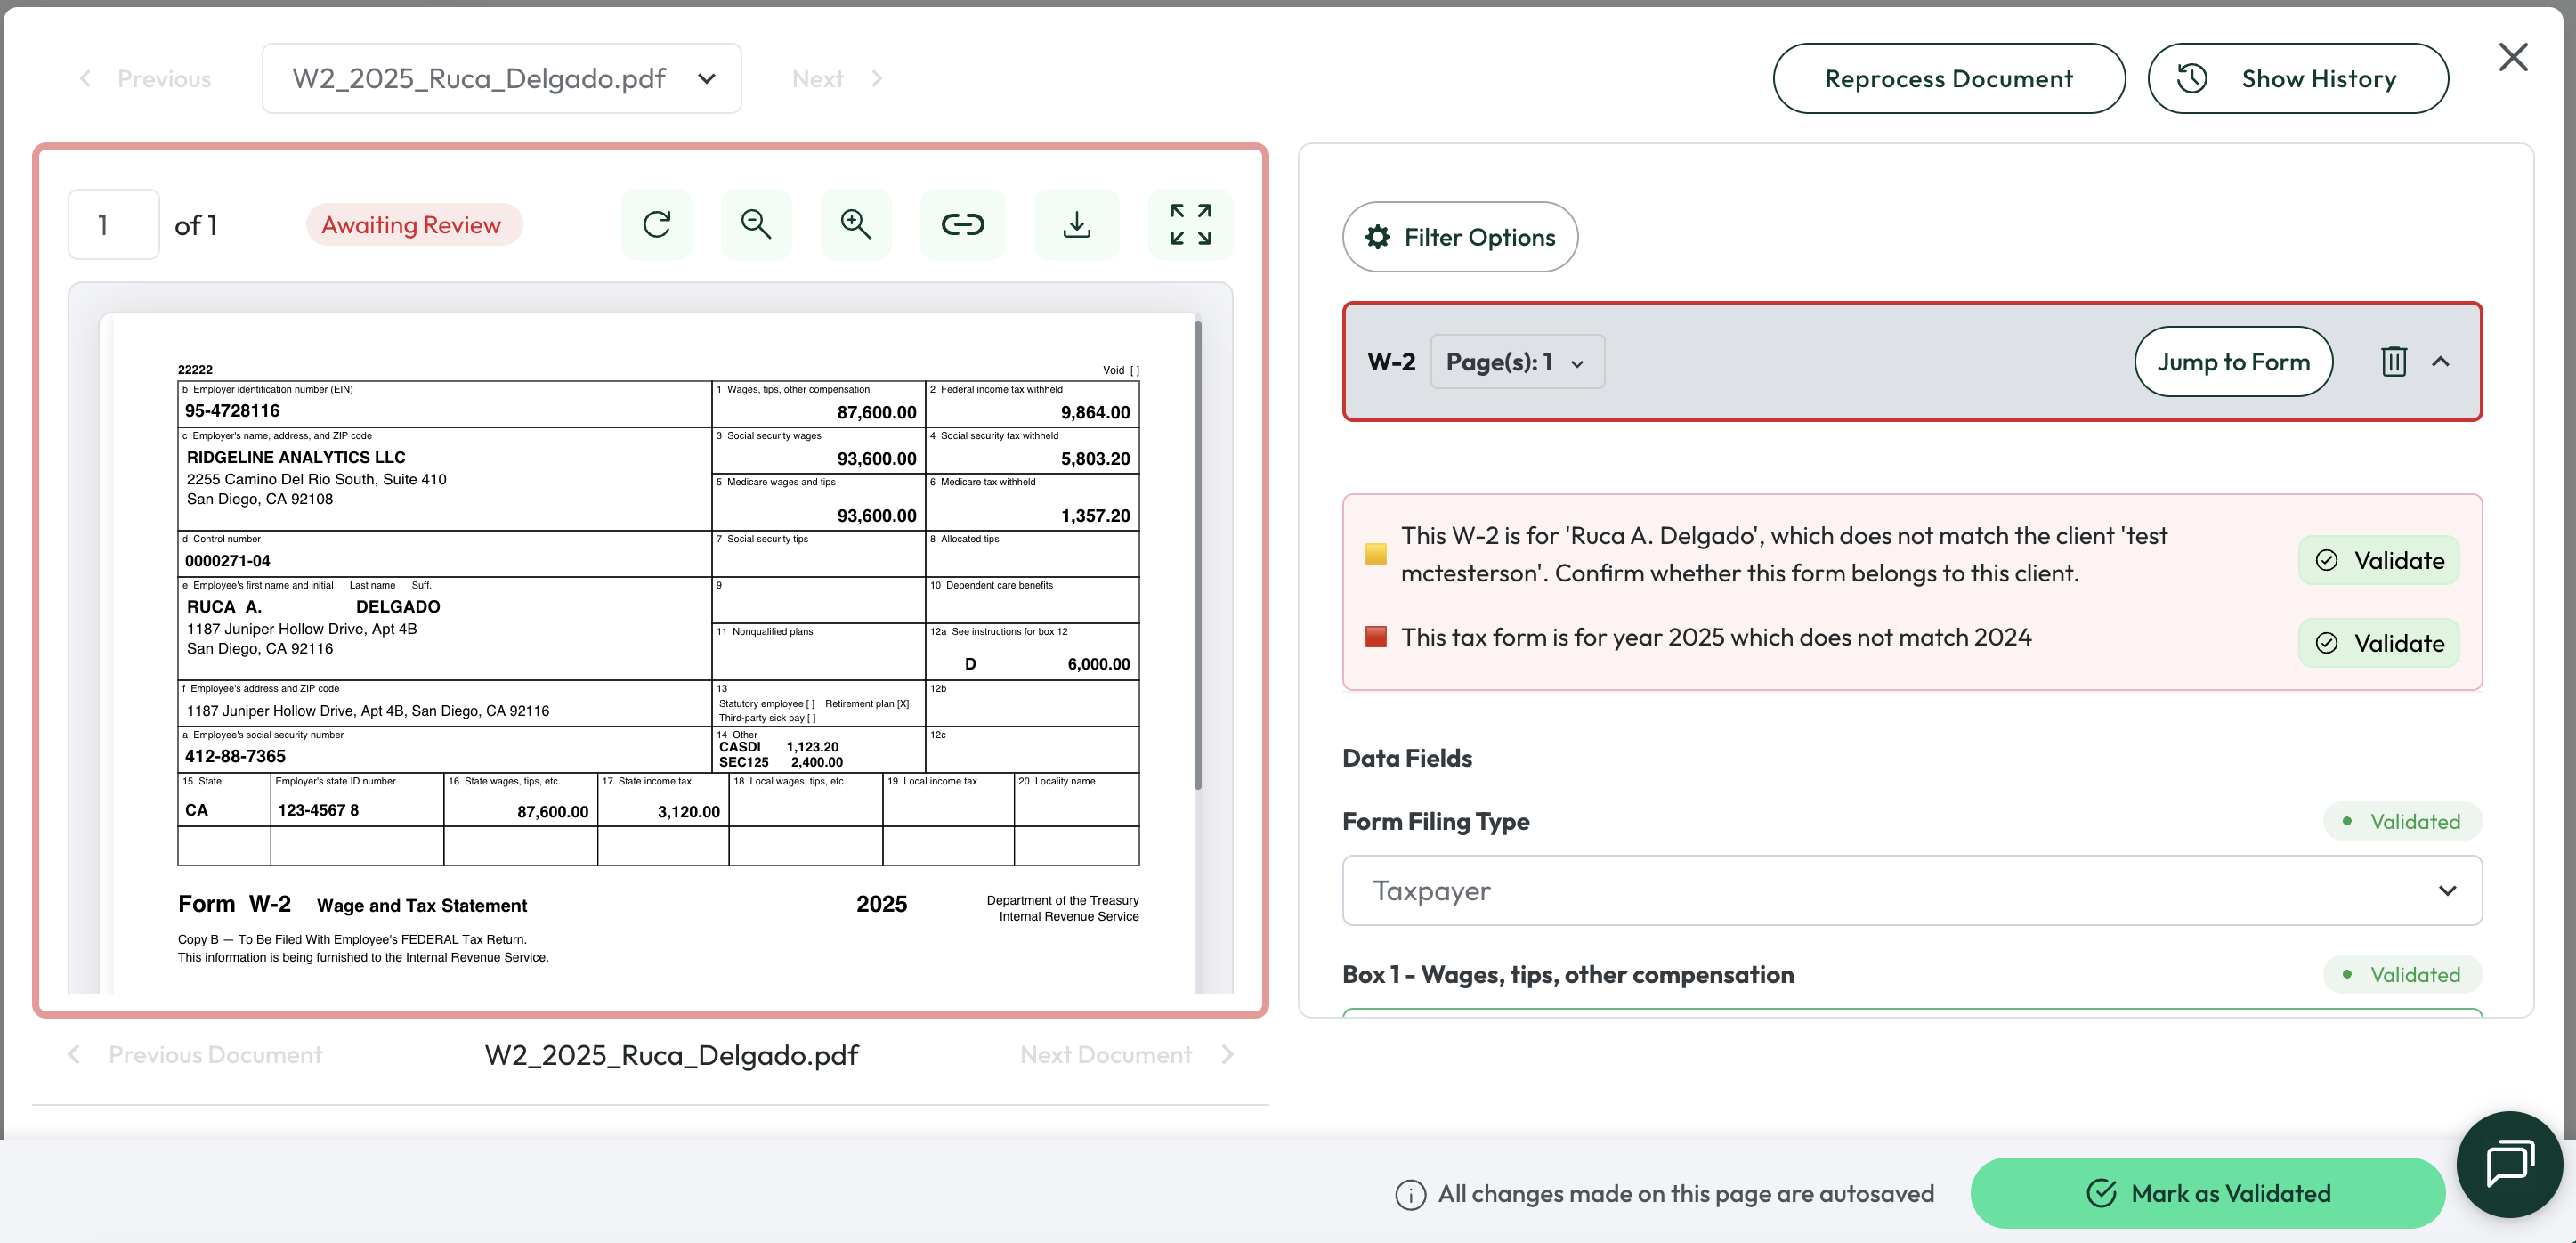
After opening a document you’ll see the following three statuses:
It is important to know Juno nor any AI data extraction system is not 100% accurate. This is why we have the human in the loop step. You’ll see that the vast majority of data Juno extracts will be assigned a “Validated” status meaning that Juno was very confident in extracting the data. However you will see other statuses which are explained below:
- Possibly Missing - The system did not extract a value and believes there might be a value missing. In most cases, fields with this status are blank on the form and require you to validate that it is in fact blank. You can do this by hitting the “Validate” button below the field.
- Flagged for Review - The system suggests taking a look at this field to double check. Often times a value may be calculated (i.e. gain/loss on a 1099B) but the system will request verification of correctness.
- Validated - The value was extracted with near perfect confidence and doesn’t require review.

In order for a document to receive the status of “Validated” you must either validate all individual fields or select the “Mark All as Validated” button at the bottom of the page.
Juno Activity
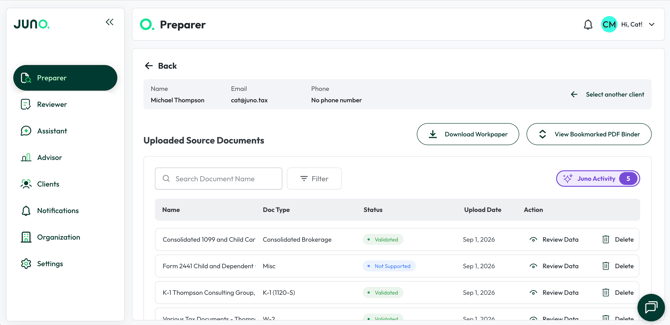
While you're reviewing your uploaded source documents, you may see a Juno Activity button in the top right of the Uploaded Source Documents section, above the document table. This is where Juno records the actions it has taken on your documents. A badge shows how many actions Juno has taken on that preparation, and clicking the button opens a scrollable list of what Juno did. If Juno hasn't taken any actions, the button doesn't appear.
Two kinds of activity are recorded, each tied to an organization setting your firm controls. If your firm has both settings turned off, you won't see the Juno Activity button.
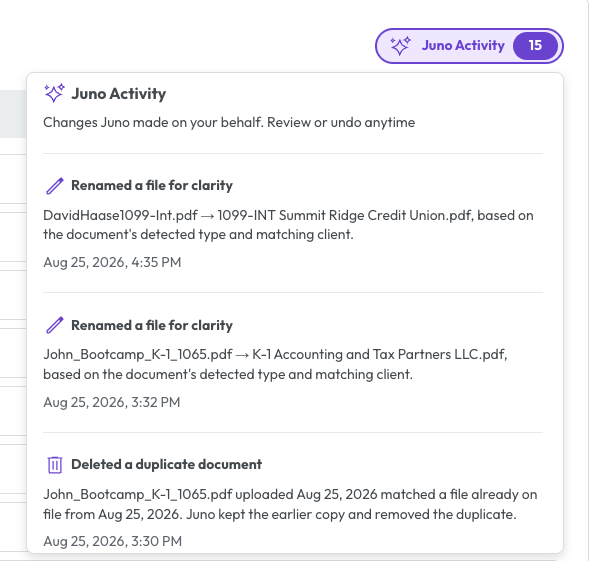
If Auto-delete duplicate documents is enabled, each auto-deleted file appears as "Deleted a duplicate document" with the file name, the date of the earlier file it matched, and a timestamp, plus a Restore File button. Clicking it adds the document back to the Uploaded Source Documents table as a processed document, and the button changes to a non-clickable "Document Restored" label. Restoring a file does not send a "New Document added to preparation" notification to your team.
If Display Documents with AI Renaming is enabled, renamed files appear as "Renamed a file for clarity" with the original and new file names and a timestamp. Rename items have no restore action.
Both settings live under the Organization tab in the navigation bar, on the "Organization Settings" tab. See Customizing Juno for more on each one.
Juno Activity currently appears on the Uploaded Source Documents screen only.
Step 4: Download Workpaper + Binder
Once all of your client’s documents are in a “Validated” status you are ready to export the preparation to your tax software. Before doing so it is important to check out the “Download Workpaper” and “View Bookmarked PDF Binder” button.
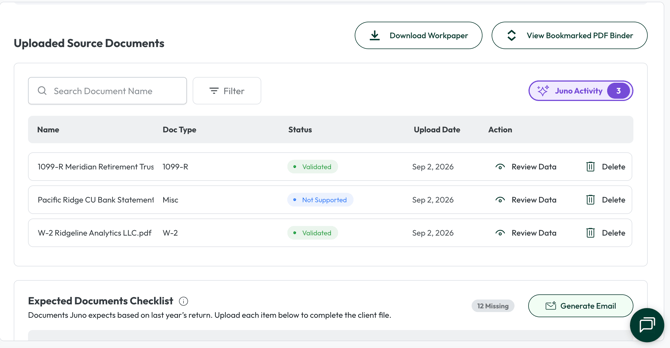
Clicking on “Download Workpaper” will have Juno automatically build a workpaper using the extracted data that you just finished validating.

Similar to the workpaper, Juno also builds a bookmarked Binder of all uploaded source documents. The binder will be generated in the order in which documents appear on a tax return.
Step 5: Exporting to Tax Software
Now that all your documents are validated you are ready to push the data to your tax software. Please note, connecting to your tax software is done after becoming a customer, not during free trial.
Next Steps:
Now that you’ve completed a preparation using Preparer we recommend checking out our Reviewer Free Trial Guide.