-1.png?width=1920&height=970&name=Juno%20Tax%20Prep%20Advisory%20Review%20(1)-1.png)
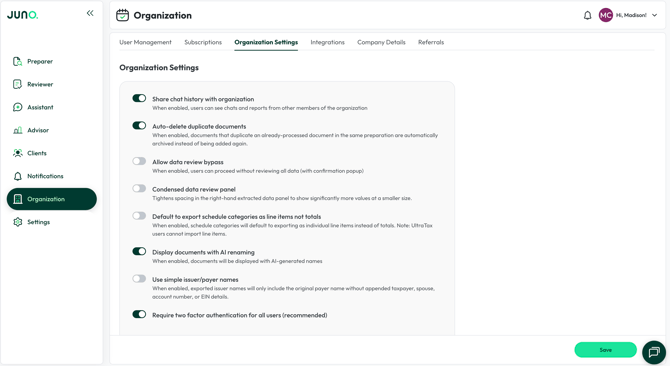
2 Factor Authentication
2FA is enabled by default for your firm. To turn it off, click the Organization Icon in the navigation bar, go to "Organization Settings," and disable it. Click "Update" to apply the change.
Each user can choose their own 2FA method: email, SMS, or an authenticator app. Email is the default for new and invited users. Users can add or switch methods from their account settings. See Setting Up and Signing In with Two-Factor Authentication for setup steps.
Method choice is available to firms that sign in with an email address and password. If your firm uses "Sign in with Google" or "Sign in with Microsoft", these options don't apply.
Auto-delete duplicate documents
When enabled, documents that are clearly identified as a duplicate document in the same preparation are automatically removed instead of being added again. You can see which files were removed and restore any of them from the Juno Activity button on the Uploaded Source Documents screen. This keeps your document list clean and your workflow simplified. This setting is enabled by default. If your firm would rather review potential duplicates yourself, you can turn it off under the Organization Icon in the navigation bar, under the 'Organization Settings' tab.
Allow Data Review Bypass
Some firms prefer to validate Juno’s data extraction in their tax software. By toggling on “Allow Data Review Bypass,” you will be able to proceed to exporting to your tax software without validating all uploaded source documents.
Condensed Data Review Panel
Want to see more fields in the human-in-the-loop screen? Toggle on “Condensed data review panel” and your screen will look like the one below when you review extracted data.

Default to export schedule categories as line items not totals
When reviewing data for a schedule, you’ll notice that “Only Export Category Total” is toggled on by default. This means that when you push your client’s preparation to your tax software, only the category total will import. By adjusting this setting in the Company Details tab, “Only Export Category Total” will be toggled off by default.

Display Documents with AI Renaming
Sometimes clients send files with confusing file names. Toggling this setting on will enable document renaming so it is clearer which document is which when you review them. For example, if a client sends you a document with the file name “39202-2025” and it's a W2 from Disney, Juno will likely rename it to “W2-Disney.” Renamed files are also logged and viewable from the Juno Activity button on the Uploaded Source Documents screen, though renames can't be reversed from there.
Share chat history with organization
This feature is turned on by default. This allows your team to see each other's Advisor and Assistant chat history, which is helpful for collaboration and for reviewing advisory scenarios with your team.

Use simple issuer/payor names
When enabled, issuer names will include only the original payer name, without appending taxpayer, spouse, account number, or EIN details.
Custom Sign Off Levels and Auto-Advance
Within the "Binder Settings" section, you can customize how many levels of sign offs are present in your Binder. For example, by selecting three sign off levels, all future Binders will have only three sign off levels present.
When Auto-Advance is enabled, applying a sign off to a page in the Binder automatically moves you to the next page.

