
How the Integration Works
Juno exports the data it has extracted and validated into a .dat file, which you then import into CCH Axcess. The whole process takes just a few minutes.
Tip before you start: Make sure CCH Axcess is connected to Juno. If you haven't done this yet, follow our How to Connect CCH Axcess to Juno article first.
Step 1: Validate Your Documents
Make sure all of the client's documents are validated, then click Proceed.
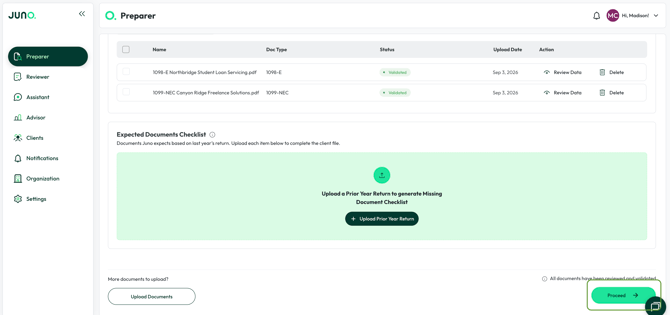
First time exporting this return? You'll see a scree asking you to upload the client's .dat file from CCH. You can find instructions for getting this file in the How to Connect CCH Axcess to Juno article.

Tip: If the client has been updated in CCH since you last imported their .dat file, click Re-Sync in the top right to upload a newer version.
Step 2: Map Your Documents
Next, tell Juno where each document should go in CCH Axcess. Use the dropdown in the Action column to choose one of three options for each document:
- Add - creates a new form in CCH and fills it with the vaildated data
- Index - maps the validated data to an existing form in CCH
- Skip - leaves this document out of the export
Why mapping matters: For returning clients, pro-forma returns, and prior-year carryovers, choosing the right action keeps your data continuous. Depending on the client's data in CCH, a form may have multiple options to map to.
For documents that can go into a return in more than one way (like a 1099-Misc), use the Maps To column to control exactly where the data lands
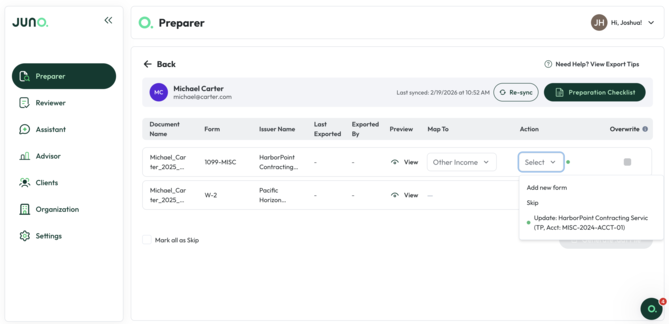
Once everything is mapped, click Import Data.
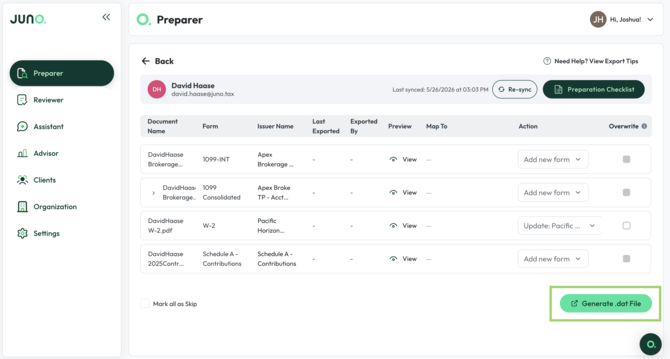
Step 3: Generate the .dat file
On the next screen, click Generate .dat file and save it. This only takes a few seconds.
Step 4: Import into CCH Axcess
- Open Return Manager in CCH Axcess
- Click the Utilities tab, then select Import

- Make sure the checkbox is selected, click Browse, and choose the .dat file you just generated in Juno

- Click Validate, then Import, then Finish once the import completes

That's it! The data should appear in CCH Axcess within a few seconds. To confirm the import finished, open Batch Manager and click Refresh.

Need to Export Again?
No problem. If a client sends you a new document after you've already exported, just repeat the steps above. You can export to a client's return in CCH Axcess as many times as you need.
Finishing Up: The Preparation Checklist
Juno exports the majority of your data, but a few fields aren't included in the export. Use the Preparation Checklist to make sure those remaining fields get added in CCH Axcess.
Questions?
If any other questions on exporting an individual's preparation to CCH Axcess come up, please contact Customer Support via live chat inside of the Juno Web App or email us at support@juno.tax. We're happy to help!