-1.png?width=1920&height=970&name=Juno%20Tax%20Prep%20Advisory%20Review%20(1)-1.png)
Preparer includes a document intake flow built around the prior year 1040. This article covers uploading it, the Expected Documents Checklist and the Generate Email button.
Step 1: Upload your client's Prior-Year 1040
Starting a New Preparation:
When you start a new preparation, Juno takes you to the standard document upload screen. You can upload the prior year 1040 here along with the client's other documents, or add it later. The prior year 1040 is used for checklist matching only. It doesn't appear in the Uploaded Source Docs table like other documents, since it isn't extracted the same way.

Don't have a prior year return, or don't want to use this flow → go straight to the standard document upload screen.
Opening an Existing Preparation:
If you reopen a draft with no documents yet, you'll land on the same document upload screen described above, with the option to upload the prior year 1040 there.
If the preparation already has documents, you won't see that screen automatically. Instead, go to the Uploaded Source Docs screen and look for the Expected Documents Checklist module.

Select Upload Prior Year Return to open the prior year 1040 upload screen. Once you upload the return, you're taken back to Uploaded Source Docs, where Juno builds the checklist.
Step 2: Review the Expected Documents Checklist
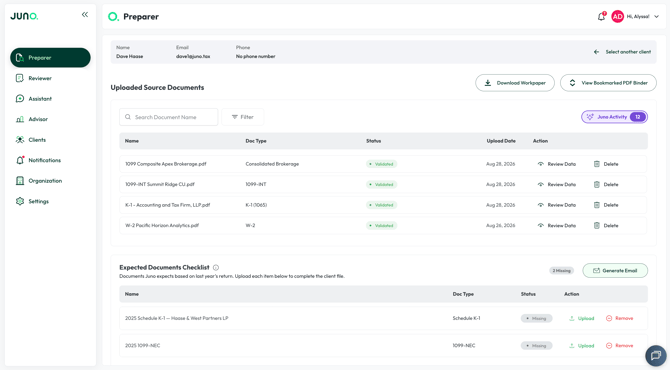
Once you upload a prior year 1040, Juno pulls the forms filed last year, and compares that list against what's currently uploaded for this year's preparation. Missing documents get added to the Expected Documents Checklist module, at the bottom of the Uploaded Source Docs screen.
- Each item shows a Missing status, the document type, and issuer where known.
- Each item has Upload and Remove actions.
- A Missing Document Count at the top shows how many items remain.
Client sends a document →Select Upload on the matching checklist item, or upload it through the normal document upload flow. The item clears once Juno finishes processing.
Document isn't needed → Select Remove and the item clears.
Once the checklist is empty or fully resolved, a Dismiss button appears to hide the module.
Step 3: Generate a missing documents email
Once you have a checklist, you can let Juno draft the follow-up for you. The Generate Email button sits just above the checklist on the Uploaded Source Docs screen.

- Select Generate Email.
- Juno opens a window with a drafted email listing the outstanding documents in a text box.
- Copy the items directly from the text box, or select Copy Email to copy the entire draft at once.

The generated email stays in sync with the checklist. As documents are uploaded and processed, they're removed from both the checklist and the email, so you can regenerate the email at any time to get an up-to-date list.
If you have additional questions, please contact Customer Support via support@juno.tax or in live chat inside the Juno Web App.